Wednesday, August 18, 2010

Free Blogspot Templates: Vintage Romance

Preview
  • From your Blogger dashboard, go to Design | Edit HTML
  • Make sure to back up your old template before install this new one by click on the "Download full template"
  • Check on the "Expand Widget Templates"
  • Now copy/paste this code to replace all the code in the HTML code section
  • Click Save Template button and you're done.

Sunday, August 1, 2010

Free Blogspot Templates: "Travelling Logbook"

Preview
  • From your Blogger dashboard, go to Design | Edit HTML
  • Make sure to back up your old template before install this new one by click on the "Download full template"
  • Check on the "Expand Widget Templates"
  • Now copy/paste this code to replace all the code in the HTML code section
  • Click Save Template button and you're done.

Saturday, July 31, 2010

Set your own photo for your Blogger blog’s background

In your Blogger Dashboard, go to Design | Template Designer | Background, click on Background Image, and you’ll notice the “Upload image” option, which will allow you to select and upload your image.

For images that fill the entire background, we recommend using a resolution of 1800 pixels wide and 1600 pixels high, and file size less than 200KB to minimize the loading time of your blog pages. Google only supports JPEG, GIF, and PNG format images.


After uploading a photo, you will see additional options that are not available for the built-in images: Alignment, Repeat, and Scroll options.
  • Alignment: You can adjust horizontal (left, center, right) and vertical (top and bottom) alignment of your background image.
  • Repeat (Tile): If you have a small image, you can have it repeat horizontally and/or vertically to fill the page. Otherwise, we recommend that you choose a page background color that blends in with your background image.
  • Scroll: By default, your image stays in place while readers scroll the page contents. By selecting the “Scroll with page” option, both the background image and page contents scroll together. We recommend that you use an image that blends into your background color or set your image to tile vertically if you choose this option.

This feature is only available on Blogger in Draft for now.

Thursday, July 8, 2010

How to promote your FeedBurner feed on your Blogger blog

One of the ways to promote your FeedBurner feed on your Blogger site is by using FeedBurner's Publicity Tools to select a "chicklet" image to display a link to your FeedBurner feed from your blog's homepage.
  1. Click the Publicize tab. A list of publicity-related services appears.
  2. Locate and click the Chicklet Chooser service.

    The form shown below loads into the right side of the screen:


    This form contains several options for buttons that promote (and link to) your FeedBurner feed.
  3. Click the radio button next to the button you want to display on your site.
  4. From the drop-down select "Blogger", then click Go! to add the chicklet as a widget.
  5. .
  6. Blogger will open in a new window. Follow the prompts there to continue to add the new widget.

Wednesday, July 7, 2010

How to create a Blogger Feed?

A site feed is a machine-readable representation of your blog that can be picked up and displayed on other web sites and information aggregation tools.

Special pieces of software called feed readers, news readers, or aggregators can scan your site feed, and automatically let your readers know when your blog has been updated. An example of such software is Google Reader, which you can use with your Google Account. Other options, including both web-based and client-side software, are listed at AtomEnabled.org.

How to create a Blogger Feed?
  1. Enter your blog's web address in the "Ready to Burn?" form found on FeedBurner's homepage and at the bottom of the pages in the Blog and Podcast sections. If you plan to publish a podcast with your Blogger feed, check the "I am a podcaster" box. Click Next ».

    The Identify Feed Source page should appear.
  2. On "Welcome", make sure the title and FeedBurner address (URL) of your new feed are values you prefer.


    The Create or Sign In To Your FeedBurner Account page should appear.
  3. Also on this page, create a FeedBurner account by picking a username and password and supplying your email address.

    When you've supplied all the required information on this page, click Activate Feed ». A "Congrats" page should appear.
  4. Read all of the information on "Congrats", then click Next » to continue with the setup process.
  5. If you selected "I am a podcaster" on the homepage, configuration options for our SmartCast service will appear. Here you can supply categories and other information for iTunes, append a copyright message, and submit your podcast to Yahoo! Search.


    When you are finished, click Next ». Configuration options for FeedBurner stats services should appear.
  6. On the stats configuration page, select the level of feed stats detail you want.


    Click Next » to finish the setup process and enter our feed management interface.

    You're now ready to make your FeedBurner feed available on your Blogger site!
Tracking 100% of your feed traffic: Redirecting your Blogger feed to your FeedBurner feed

Blogger can make sure all feed traffic for your blog content goes to your FeedBurner feed. This ensures your FeedBurner stats are comprehensive and accurate; even subscribers to the 'Original Feed' are routed through FeedBurner. To redirect your feed:
  1. In a new browser window, sign in to your Blogger account.
  2. From the Blogger Dashboard, click the Settings link for the blog you want to promote. The Settings page for your selected blog should appear.
  3. Click the Site Feed link under the Settings tab.
  4. .
  5. Type your complete FeedBurner feed address into the Post Feed Redirect URL text field. Make sure you type in your entire feed address including the "http://" portion. Click Save Settings.
  6. You should see the message "Settings were Saved Successfully".
  7. Blogger will now redirect all feed traffic for your blog to your FeedBurner feed.
That one site feed may be enough for you, but if you want some more options, click on the "Advanced Mode" link.


In Advanced Mode you have options for three different types of feeds. The first is for your blog posts, and is the same as the single option in Basic Mode. After that comes the comment feed. This one will contain all comments made on all posts on your blog. Finally, there is the per-post comment feed. With this option, each individual post will have its own site feed, containing only its own comments. Each option has the same "Full," "Short," and "None" setting choices.

Friday, July 2, 2010

Blogger Stats

The coolest thing about the new Blogger Stats is that it monitors and analyzes your visitor traffic in near-real-time. You can see which posts are getting the most visits and which sites are sending traffic to your blog right now. For example, if a reader shares one of your blog posts on Twitter and the post is getting lots of clicks, you will see a traffic increase in Blogger Stats almost instantly, with the particular Tweet mentioning your post being identified as the traffic source. Of course, traffic data across longer time periods (day/week/month) and all-time historical data are available as well.


There's also a lot more data that's being tracked, such as popular search keywords that send visitors to your blog, which country your visitors come from, and which web browsers they are using. Basically, with the new Stats feature, you know what's going on with your blog right now.

The new Stats feature shows all of this data in a simple, easy-to-understand graphical user interface. Since Stats are part of Blogger, you don't have to sign up for another service, or embed any code in a gadget.

Additionally, if you want the enterprise-level power and flexibility of Google Analytics, you can still use it, as we have an article here. Note that the pageview data in Blogger Stats and in Google Analytics may not be identical, due to different collection mechanisms used. Also, Blogger Stats do not support private blogs for now.

Check out the new Stats feature now by go to Blogger in Draft, and you'll notice a new "Stats" tab. You don't have to install or configure anything to start benefitting from Stats.

Tips:

Self-view exclusion: You can now exclude your own visits by clicking on “Don’t track your own pageviews” link on the Stats | Overview page. We’re also now excluding traffic coming from Blogger admin admin pages and post Preview, providing more accurate pageview data.

Wednesday, June 23, 2010

Adding Reactions to blog

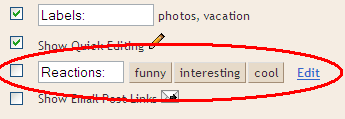
Adding Reactions is done through the settings page of the Blog Post widget. From the Design | Page Elements tab, simply click the 'Edit' link under the Blog Post widget and a settings window will pop up.

The Configure Blog Post window will display a handful of options, and the Reactions feature is near the bottom of the list:


To turn on Reactions just select the checkbox, and then you will be able to customize the feature by adding words of your choosing. Finally, you can choose the exact location of Reactions by dragging the widget at the bottom of the Configure Blog Post page:


Tips
You can customize the location of the Reactions within the post by dragging the preview around in the “Arrange Items” box.


You can customize the options and their label to match the theme and style of your blog.


Additional Notes

  • This is a Layouts-only feature. If you’re using a Classic template you’ll need to upgrade to Layouts to add Reactions.
  • The buttons should blend seamlessly with most blog backgrounds. Button backgrounds are a mostly transparent grey which should coordinate with everything. The text and button highlight colors for the ratings are taken from the following skin variables:
    • Foreground: textcolortextColor, mainTextColor
    • Highlight: linkcolor, linkColor, mainLinkColor
  • If you have customized your blog widget’s template you may not see the reactions. You will need to either reset your blog widget’s template or copy the Reactions code from a fresh template. Search for “reactions-buttons” to find the appropriate block of code.
  • A known issue: if you choose short words/phrases, it’s possible to enter enough options that the line of buttons will wrap (and not look very good).

Thursday, June 17, 2010

How to link authors' names to profiles on your own/team blog

If you have several people posting to a blog, you might want to set it up so that each person's name at the end of their posts links to their profile. Comments currently work this way automatically, but we don't yet have this feature for regular posts. Here's a way to get around that and make it work.

First, what you'll have to do is get the profile addresses for each person who will be posting to the blog. You'll notice that each one looks something like this: http://www.blogger.com/profile/XXXXXXX where "XXXXXXX" is a particular ID number. Make a note of that number for each person.

Replace "First Member" with the name that appears on the first member's posts, and replace "XXXXXXX" with the ID number corresponding to that person's profile. Repeat for the second member and so on, adding as many more lines as you need.

Now, look at the section of your template between the <Blogger> tags, where the posts themselves are displayed. There you should be able to find the <$BlogItemAuthorNickname$> or <data:post.author/> tag, depending on what kind of template you have. This prints out each persons display name. Replace that tag with the following:
Next, add the following code to your template, between the HTML <head> tags:
<script type="text/javascript">

var team = new Array();
team["First Member"]="XXXXXXX";
team["Second Member"]="YYYYYYY";
team["Third Member"]="ZZZZZZZ";

function makeprofilelink (authorname) {
var pid = team[authorname];
document.write("<a href=\"http://www.blogger.com/profile/"
+ pid + "\">" + authorname + "</a>");
}

</script>
(for classic templates)
<script type="text/javascript"> makeprofilelink("<$BlogItemAuthorNickname$>"); </script>

(for layouts)
<script type="text/javascript"> makeprofilelink("<data:post.author/>"); </script>

When you're all done, preview it to make sure it works, then save the changes and republish. The result will be something like this at the end of each post, with the appropriate profile link for the name:
... blah blah blah and that's the end of my post.
# posted by Free Blogpot Templates at 12:09 AM.
Notes:

  • You will need to update the list of members and their ID numbers anytime you add new people, or any time they change their display names.
  • Each member will need to have a unique display name, so they will be linked to the correct profile.

Tuesday, May 11, 2010

How to edit labels on multiple posts at once

The Edit Posts page includes options for displaying posts by label, and for applying or removing labels on batches of posts. To get there, visit the Posting | Edit Posts tab, or just click the Edit Posts link on your dashboard.


This page has all labels in use by this blog listed on the left-hand side. Each individual post also has its particular labels marked in green next to its title. By default, posts with all labels are shown.


(Note: You'll only see the labels here if you have at least one post already labeled. You can label an individual post on the posting form.)

If you click the label links on the left-hand side, the list of posts will be narrowed down to show only posts with that particular label.

Each post has a checkbox next to it. If you want to make a change to multiple posts, first check all the ones that you want to affect. Then select an option from the "Label Actions..." menu.


This menu includes options for adding any of your labels to the select posts, as well as for removing labels already on the posts. You can also select "New Label..." if you want to create a label that you don't already have.

If you want to edit a label across all posts, you can do so by removing it and then adding a new one. For instance, say you want to change the label "Books" to "Reading." Just follow these steps:
  1. Click the "Books" label link on the left side of the page.
  2. Click the "Select All" link at the top of the list of posts.
  3. From the "Label Actions..." menu, choose "Remove label > Books."
  4. From the "Label Actions..." menu, choose "Apply label > New Label..."
  5. Enter "Reading" as your new label. (If you already have some posts with the label "Reading," you can simply apply that label, without making a new label.)

Saturday, May 1, 2010

How to add HTML code in your Blogger post

For some reasons, many of you need to put HTML code in Blogger post but may not know how to show them in posting. So this method will teach you how to do it by manual:
  • Open your Notedpad
  • Copy and paste the code into your Notedpad
  • Use Edit | Replace (or Ctrl+H) then type < in Find what and type &lt; in Replace with. Click Replace all to replace them.
  • Do the same for > with &gt;
  • Now copy and paste all your code from Notepad into your Blogger post.
Publish your post and see your work. Good luck!