Showing posts with label Design. Show all posts

Friday, July 8, 2011

Blogger interface is now available

According to Blogger team. As of right now, the new interface is available for all Blogger in Draft users. There is no sign up or activation process required; Just visit Blogger in Draft, and you’ll find the revamped interface.

Blogger new interface

Inspired by Google’s newest design evolutions, Blogger teamn have updated the look and feel of their new design. Over the last couple of months, we’ve made significant improvements to our new user interface. First and foremost, we’ve incorporated your feedback and made numerous fixes based on that feedback.

As you know, Blogger in Draft is Blogger’s equivalent to “Google Labs”. As Draft users, you'll get to experience Blogger's newest features, including the new design, earlier than other users. If you’re not yet on Blogger in Draft, simply go to draft.blogger.com, and check on the “Make Blogger in Draft my default” option on your dashboard.

Thursday, June 9, 2011

Customize favicon for your Blogger's blog

For many bloggers, having a custom favicon (the tiny image displayed in your browser’s window or tab) is the finishing touch that ties together the design and identity of a great looking blog. Today, Blogger's team announced that Blogger in Draft users can now add a customized favicon to their blog. Many bloggers have waiting this customize for long time.

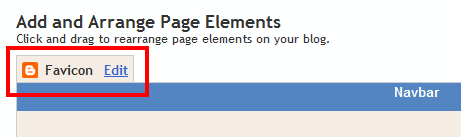
You can add a custom favicon from the Design | Page Elements tab (or, from the Layout tab if you're using the new user interface), by clicking Edit on the new “Favicon” setting above the navbar element:


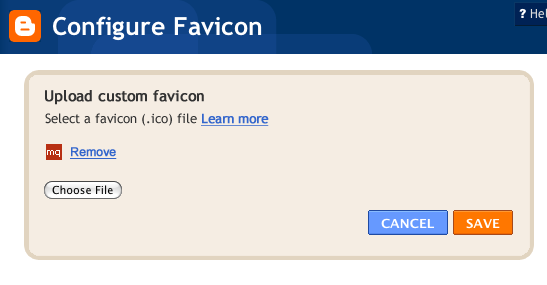
A new window will then open where you can select an image from your hard drive to replace the default favicon image. This initial launch only supports .ico files, but you can easily convert your JPEG, PNG, or other non-ico image file using your own image software. There are also many conversion tools online, and a quick Google Search brings up a handful of options such as http://www.icoconverter.com/.


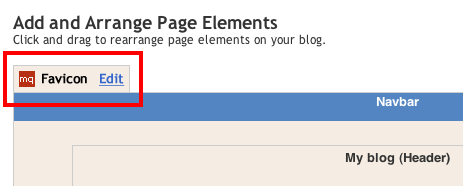
Once you’ve selected the .ico file for your favicon, click Save. Blogger will automatically resize the image to the correct dimensions, and you’ll then see the Page Elements updated with your selected favicon image:


When you save your template changes, you’ll see your newly-added favicon image displayed in your browser window or tab. That’s it!

Thursday, March 31, 2011

Dynamic Views for Blogger blog

Today Blogger's previewing five new dynamic templates in Blogger that you’ll soon be able to customize and use for your blog. These new views use the latest in web technology, including AJAX, HTML5 and CSS3, to deliver a host of benefits to you and your readers:
  • Infinite scrolling: read more posts without having to reload or click to a second page
  • New layouts: different views suited to different types of blogs
  • Speed: download images as you view them, not all at once in advance
  • Interactivity: there are now more ways to experience and engage with blog content
To try these views on your own blog, simply add “/view” to the end of the blog URL—for example, http://freeblogspottemplates.blogspot.com/view. These new views are available on all public Blogger blogs with feeds fully enabled.


These dynamic views will work on your blog if all of the following are true:
  • Your blog is public. Your readers don’t need to sign in to view your blog.
  • Your blog has feeds fully enabled. In the Settings | Site feed tab, you have enabled either Full or Jump Break for your Post Feed.
  • You have not disabled dynamic views. In the Setting | Formatting tab, the option for Enable Dynamic Views is set to Yes.
If any of the above conditions are not true, users who attempt to access dynamic views for your blog will instead be taken to a landing page and redirected to your original blog in a few seconds.

Monday, March 21, 2011

Adding a Drop-Down menu to your Blogger blog

One of the most convenient way to display huge lists of links, like BlogRoll or favorite sites etc. is using a drop down menu. The tool is very useful for webmasters and bloggers, and equally simple is the coding required to put it on your blog/web site.

Follow these simple steps, to add a Drop-Down menu to your blog:

From your Dashboard, go to "Design" section, then click on "Add a Gadget", and select it as "HTML/JavaScript"
Now put this code in to it:
<form><select name="menu" onchange="window.open(this.options[this.selectedIndex].value,'_blank')"
size=1 name=menu>
<option>- Your Title - </option>
<!-- change the links with your own -->
<option value="http://yourlink#1.com">Title One</option>
<option value="http://yourlink#2.com">Title Second</option>
<option value="http://yourlink#3.com">Title Third</option>
</select></form>
Replace the titles in blue and the links in red with your owns then click Save and you're done.

Enjoy!

Saturday, December 18, 2010

Enable mobile template for your blogger blog

Many of you like to view blog posts on your smartphones. However, it can be difficult at times because of the small screen size. Today, Blogger Team announced that they launched of mobile templates for Blogger in Draft users. Initially available as opt-in functionality on Blogger in Draft, mobile templates will re-format your blogs for smartphones to enhance your readers’ viewing experience. To enable mobile templates for your blog, simply go to Dashboard | Settings | Email & Mobile tab, enable the mobile template option and then save settings.

  • Preview: Get a glimpse of what your blog will look like by clicking on the Mobile Preview button. You can also see it on your smartphone by scanning the QR-code to the right of the options.
  • Automatic redirection: All opted-in blogs will automatically be redirected to the mobile view when accessed from a smartphone.
  • Template support: Blogger is initially supporting 6 variants of the Simple template and 6 variants of the Awesome template. If you have used one of these 12 templates through our Template Designer, your mobile view will be rendered in the same style as your desktop view (other template variants will be rendered as Simple). Some gadgets are also supported.

Tuesday, December 14, 2010

Free Christmas header images for your blogger blogs

Here are 35 free Christmas header images for your blogger blog in this Holiday Season. Click here if you don't know how to adding an image to your blog header.


Monday, November 22, 2010

More fonts for your Blogger blog

Today, Wongoo Lee from Blogger team announced that they have added 40 new more fonts for bloggers who are using their Blogger blog service.
Self expression is a beautiful thing. It’s one of the best things about having a blog—a place where you can control the look and feel of your message and how it’s presented. Today we’re excited to announce another amazing way to make your blog truly you—Web Fonts.

The Web has traditionally been pretty limited when it comes to font selection, especially for non-Latin alphabets such as Cyrillic and Greek. But great strides have been made in this arena by our friends on the Google Web Fonts team, and finally there are more choices out there than just Arial and Times New Roman. In fact, there are now 40 new fonts on Blogger in Draft for you to choose from. And we’re just getting started—lots more to come!
Simply go into the Advanced tab of the Blogger Template Designer, select the type of text you’d like to change (Post Title, Page Text, etc.) and pick from a number of exciting, new fonts such as Reenie Beanie  or Neucha (Cyrillic) or GFS Didot (Greek) or even Hanuman (Khmer). You will be spoilt with choice!

Wednesday, November 10, 2010

Magazine Style Drop Caps

Dropcaps like in a fancy magazine is what you see in this post. If you like this tip, just follow this guide step by step.

Go to Design | Edit HTML in your Blogger Dashboard, and then paste the code below to your CSS-definitions between the HEAD tag.


Now in every of your posts, you need to put the fisrt letter between the tag SPAN like this: <span class="dropcaps">D</span> in Edit HTML section. The result is very nice: a large capital that stretches over 5 lines in your post.

Remember that you can change the font size bigger or smaller or setting the color in different from the code above if you want.

* Tips: To make it easier, Post Template will help you save your time by pre-formatting the post editor with text or code that will appear each time you create a new post.
  • In your Blogger Dashboard, go to Settings | Formatting then scroll down and you'll see the Post Template section at below of the page.
  • Copy/paste your text or code that you want to edit here.
  • Click Save Settings to save your changes.
Here is an example for Dropcaps hack in this article:

Saturday, July 31, 2010

Set your own photo for your Blogger blog’s background

In your Blogger Dashboard, go to Design | Template Designer | Background, click on Background Image, and you’ll notice the “Upload image” option, which will allow you to select and upload your image.

For images that fill the entire background, we recommend using a resolution of 1800 pixels wide and 1600 pixels high, and file size less than 200KB to minimize the loading time of your blog pages. Google only supports JPEG, GIF, and PNG format images.


After uploading a photo, you will see additional options that are not available for the built-in images: Alignment, Repeat, and Scroll options.
  • Alignment: You can adjust horizontal (left, center, right) and vertical (top and bottom) alignment of your background image.
  • Repeat (Tile): If you have a small image, you can have it repeat horizontally and/or vertically to fill the page. Otherwise, we recommend that you choose a page background color that blends in with your background image.
  • Scroll: By default, your image stays in place while readers scroll the page contents. By selecting the “Scroll with page” option, both the background image and page contents scroll together. We recommend that you use an image that blends into your background color or set your image to tile vertically if you choose this option.

This feature is only available on Blogger in Draft for now.

Thursday, June 17, 2010

How to link authors' names to profiles on your own/team blog

If you have several people posting to a blog, you might want to set it up so that each person's name at the end of their posts links to their profile. Comments currently work this way automatically, but we don't yet have this feature for regular posts. Here's a way to get around that and make it work.

First, what you'll have to do is get the profile addresses for each person who will be posting to the blog. You'll notice that each one looks something like this: http://www.blogger.com/profile/XXXXXXX where "XXXXXXX" is a particular ID number. Make a note of that number for each person.

Replace "First Member" with the name that appears on the first member's posts, and replace "XXXXXXX" with the ID number corresponding to that person's profile. Repeat for the second member and so on, adding as many more lines as you need.

Now, look at the section of your template between the <Blogger> tags, where the posts themselves are displayed. There you should be able to find the <$BlogItemAuthorNickname$> or <data:post.author/> tag, depending on what kind of template you have. This prints out each persons display name. Replace that tag with the following:
Next, add the following code to your template, between the HTML <head> tags:
<script type="text/javascript">

var team = new Array();
team["First Member"]="XXXXXXX";
team["Second Member"]="YYYYYYY";
team["Third Member"]="ZZZZZZZ";

function makeprofilelink (authorname) {
var pid = team[authorname];
document.write("<a href=\"http://www.blogger.com/profile/"
+ pid + "\">" + authorname + "</a>");
}

</script>
(for classic templates)
<script type="text/javascript"> makeprofilelink("<$BlogItemAuthorNickname$>"); </script>

(for layouts)
<script type="text/javascript"> makeprofilelink("<data:post.author/>"); </script>

When you're all done, preview it to make sure it works, then save the changes and republish. The result will be something like this at the end of each post, with the appropriate profile link for the name:
... blah blah blah and that's the end of my post.
# posted by Free Blogpot Templates at 12:09 AM.
Notes:

  • You will need to update the list of members and their ID numbers anytime you add new people, or any time they change their display names.
  • Each member will need to have a unique display name, so they will be linked to the correct profile.

Friday, April 30, 2010

How to change Fonts and Colors for your Blogger blog

In the Advanced tab from Design | Template Designer, you can easily edit and customize the fonts and colors of your blog without any knowledge of HTML or CSS.


How to edit the colors in your blog?

First choose the element you would like to change the color of. Then choose the color you would like that element to be. You can either click on the color you want or enter your own color hex code. There are two other options for your better choice by choosing "Colors from this template" and "Suggested colors" provided by Blogger.

When you change your blog colors, you can view your changes in the blog preview beneath the Advanced panel. Click on "Expand preview" to open it higher. Make sure you save your changes after you have finished selecting the colors for your blog by licking APPLY TO BLOG button in the right corner above your screen. If you don't like your changes, you can revert back to your default colors by clicking "Clear advanced changes to..."

How to edit the fonts in your blog?

First choose the element you would like to change the font of. Then choose the font you would like that element to be by clicking the radio button next to your font of choice. You can also change the font style to bold and/or italic by checking the box next to the style you want and you can make the font size larger or smaller by choosing a size from the font size box.

When you change your blog's fonts, you can view your changes in the blog preview at the bottom half of the screen. Make sure you save your changes after you have finished selecting the fonts for your blog by licking APPLY TO BLOG.

Saturday, March 13, 2010

Blogger Template Designer

Blogger Template Designer is a new way for you to easily customize the look of your blog. You can select a variety of templates, images, colors, and column layouts to make your blog an expression of you.


As you play around with the Template Designer, you’ll see a preview of how the blog will appear based on the choices you’ve made, which you can expand to by pressing the toggle to Expand Preview between the Blogger Template Designer dashboard and the preview. When you’re satisfied with the look of your blog, you can make them go live by pressing Apply to Blog in the top right hand corner of the Template Designer.


To get started with Blogger Template Designer, select a template for your blog from one of the professionally designed templates that are available. Each template appears as a large thumbnail that when clicked will show different variations on the template below that you can select by clicking on them. Note that clicking a new template will erase any customizations you’ve made on a previous template. Once you’ve chosen a template, you can continue customizing the look of your blog.

No matter what template you are previewing in Template Designer, you can always see what is currently live on your blog by looking at the Live on Blog thumbnail in the Template Designer control panel. You can also click on it to reset the template in the Template Designer to the live version of your blog.


Background

Even though you’ve chosen a template, you can still change the way that it looks. Using Blogger Template Designer, you can choose the background color or image for your blog and then play with the color scheme. To start customizing your background, click on the thumbnail under Background Image.

One of the best new features of Template Designer is the ability to change the color of your background image. This is possible when a background image has transparency. You can tell that a background image is transparent because it has a checkerboard in the top right hand corner of the image.


Once you’ve selected your image, you can change the color of the background by clicking on Main Color Theme and then selecting the color of your choice.


You can only change the color of your background if the background is transparent. Also, if the template that you chose has a grey background, you cannot change its color.

In addition to selecting and personalizing your blog’s background image, you can also choose a color theme to apply to aspects of your blog, including text and links. You can do this by playing with the Main Color Theme or by choosing one of our Suggested Themes. Changing the color theme of your blog will change the colors for all aspects of the blog template that can be changed.

Note: If background image is not transparent, themes will alter the text color scheme of the blog.

Layout

You can choose a variety of layout options for your blog, from one to three columns. These layouts feature drag and drop functionality for gadgets. You will also have a variety of layout options for the blog footer as well.


If you want to add or remove gadgets or edit gadget settings, you cannot do this through Blogger Template Designer. Rather, you have to do this on the general Layout tab.

Adjust Width

You can change the width of the blog, and the right and left columns by dragging the slider for the different parts of blog layout. Note that the options you see here correspond to the type of layout that you chose. If, for example, you chose a blog with left and right columns, you will see both left and right column sliders. If, however, you chose a blog with only a left column, you will only see that option here.

Saturday, February 20, 2010

How to change your Display Name that appears at the end of each post

To change your Display Name, click the Edit Profile link on your Dashboard page:


Scroll down to the Identity section and change the Display Name:


Once you've changed your Display Name, click the Save Profile button at the bottom of the page.

Sunday, January 10, 2010

Adding image to your blog header

It's very simple for now to adding an image (or banner) to your blog header by following these steps:

  1. Login to your Blogger Dashboard
  2. Go to Design (or Layout)
  3. In Page Elements tab, click Edit on your blogger Header element.
  4. From Configure Header panel, browse an image from your computer or place an image URL from internet that you want to make it for your header image
  5. After the image is uploaded, you can select one of  these options "Behind title and description", "Instead of title and description" or "Have description placed after the image". Check on "Shrink to fit" option to let Blogger auto-scales your image to blogger's dimension.
  6. Click SAVE button to done your works and enjoy your blogging! ;-)