Saturday, February 27, 2010

How to Backup / Restore your Blogger Template

Your Blogger blog is stylized based on a blog template that you have full access to. This blog template allows you to manipulate the visual appearance of your Blogger blog and gives you the freedom to create a unique personal brand by using the Edit HTML mode in Design tab. When you decide to enhance your Blogger blog by editing the template you will have to backup your blog template first to ensure you have a restore file in case you make a mistake in the editing process. This step-by-step guide will show you how.
  • From your Blogger Dashboard, go to Design | Edit HTML.
  • To backup your blog template,  click the link "Download Full Template" under the "Backup / Restore Template" pane. Choose the option to save your template file from the next dialog that pops up. Browse to the location you want to save it and click Save. The template will be downloaded to the specified location. It's a small XML file and has all the details of your current template.
  • To restore your blog template, just click the Browse button and browse to the downloaded template file then click Open. Click Upload button and Blogger will restore your template.

* Make sure to backup your blog template everytime you want to edit it in Edit HTML mode.

Saturday, February 20, 2010

How to change your Display Name that appears at the end of each post

To change your Display Name, click the Edit Profile link on your Dashboard page:


Scroll down to the Identity section and change the Display Name:


Once you've changed your Display Name, click the Save Profile button at the bottom of the page.

Sunday, February 14, 2010

Making Custom Templates Compatible With Pages Tabs

If you are familiar with HTML and want Pages as tabs, follow these steps carefully (caution - this is not for the faint of heart!):
  1. Make sure the Pages Widget hasn't already been added, if so, remove the widget
  2. Go to the Design | Edit HTML tab for your blog
  3. Download a backup of your template by clicking Download Full Template
  4. Click the checkbox next to Expand Widget Templates
  5. Look for the following three lines of HTML. If this HTML exists, change showaddelement='no' to showaddelement='yes'
    <div id='crosscol-wrapper' style='text-align:center'>
    <b:section class='crosscol' id='crosscol' showaddelement='no'/>
    </div>
  6. If this HTML does not exist, paste the following lines of HTML where you want the tabs to appear (for instance, after <div id="content-wrapper">)
    <div id='crosscol-wrapper' style='text-align:center'>
    <b:section class='crosscol' id='crosscol' showaddelement='yes'/>
    </div>
  7. Confirm tabs are correctly added, click Save Template
  8. Go to Design | Page Elements and look for the new horizontal Gadget area and add the Pages gadget there.
Read more: Create Pages in Blogger

How Blogger autosaves your posts

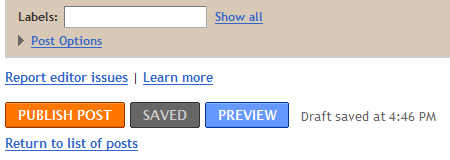
When you create a new post, Blogger will start automatically saving it for you once a minute, without interrupting your typing. When it does this, you'll see a little note next to the "Save" button, like this:

If you want to make sure the saved copy is completely up to date, you can click the "Save" button yourself. You'll remain on the posting form and can continue typing, since the saving happens in the background. If you're done working on the post for now, you can either click "Publish Post" to convert the draft into a post, or click "Return to list of posts" if you want to leave it as a draft and go back to the Edit Posts page.


This autosave feature means that you have a safety net for the cases when you're working on a new post and the power goes out, or your browser crashes, or some other calamity occurs. All you have to do is log back in to Blogger and find your saved draft on the Edit Posts page. You can even do that from a different computer.

Note: Autosave does not occur when you are editing posts that have previously been published to your blog. This keeps your readers from seeing your edits until you're done with them. When editing a published post, you can click "Publish Post" to republish the changes to your blog, or click "Save as Draft" to unpublish the post and turn it into a draft.

Tuesday, February 2, 2010

How to Import or Export your Blogger blog

Now you can export all of your posts and comments into a single, Atom-formatted XML file for easy backup. You can then import the posts back into Blogger, either into an existing blog or into a new one.

To export your blog, log in to http://draft.blogger.com/ and go to the Settings | Basic page. You’ll see the Blog Tools links at the top of the page for importing and exporting.

* Google also moved blog deletion up here from the bottom of the page. Don’t worry about accidentally clicking it, though; your blog wouldn’t be deleted until you confirmed on the next page. By the way, if you deleted your blog, you can be restored it within 90 days before it is removed forever.

Once you click “Export blog” and press the “Download blog” button on the next page, your browser will prompt you to save the XML file for your blog. Keep it somewhere safe as a backup, or import it into a different blog.


You can import one blog into another from the Blog Tools links, or when creating a new blog. Look for the “Advanced Setup Options” at the next page. There's an Import Blog Tool, click on it to import your XML file.


When you import a blog, all of the posts will get saved in an “imported” state. From there you can publish just a few, or all of them at once. Here are some ideas for what you can do with importing and exporting:
  • Merge two or more blogs into one. Take the exported posts and comments from one blog and import them into another one.
  • Move individual posts from blog to blog. After importing, select just a set of posts to publish and publish them with one click.
  • Back up your blog to your own storage. You can keep your words safe and under your control in case anything happens to your blog, or us, or if you want to remove them from the Internet.
  • Move your blog somewhere else. Our export format is standard Atom XML. We hope to see other blogging providers extend their Atom support to include import and export. And, if you decide to come back to Blogger, importing your export file will get you back up and running in seconds.
Caveats
  • The export format currently only covers blog posts and comments to those posts, not blog settings or templates. To back up a Classic template, copy and paste the template code from the editor. To back up a Layouts template, use the Backup / Restore template option to download a copy of your template.
  • Before importing a blog for the first time, we recommend that you create a new, throwaway blog to import into so you get a sense for how the process works. Once you’re comfortable, import into your public blog.
  • At the moment there is a 1MB size limit on the blog you can import.
Have you imported or exported your blog?

Friday, January 29, 2010

Blogger shortcuts

Blogger has several keyboard shortcuts you can use while editing posts. They definitely work in Internet Explorer 5.5+/Windows and the Mozilla family (1.6+ and Firefox 0.9+), and might work in other browsers. Here they are:
  • CTRL + b = Bold
  • CTRL + i = Italic
  • CTRL + l = Blockquote (when in HTML-mode only)
  • CTRL + z = Undo
  • CTRL + y = Redo
  • CTRL + shift + a = Link
  • CTRL + shift + p = Preview
  • CTRL + d = Save as Draft
  • CTRL + p = Publish Post
  • CTRL + s = Autosave and keep editing
  • CTRL + g = Indic transliteration

Thursday, January 21, 2010

Create Pages in Blogger

Blogger pages let you to publish static information on stand-alone pages linked from your blog. For example, you can use pages to create an About This Blog page that discusses the evolution of your blog, or a Contact Me page that provides directions, a phone number, and a map to your location.

You create a page similar to how you write a blog post. From Blogger in Draft click Posting | Edit Pages tab, then click New Page. (Note: you can create up to 10 pages)


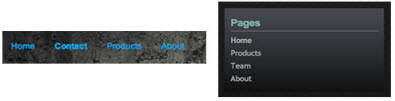
Once your page is published, you can link to it from the new Pages widget. The Pages widget lets you add links to your pages as tabs at the top of your blog, or as links in your blog's sidebar. (Note: existing third party templates may not support pages as tabs, but pages can still be added as links in your blog's sidebar)


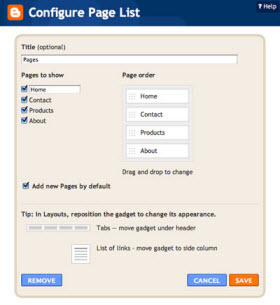
In the Pages widget, you can decide which pages will have links, and in what order they will appear. You can also choose whether or not you want links automatically created for pages when you create them by checking or unchecking the box to the left of Add New Pages by Default.


* For those of you that have custom templates, your custom template may not automatically support Pages as horizontal "tabs".

Tuesday, January 19, 2010

What are the limits on Blogger blog account?

Number of Blogs: You can have as many blogs as you like on one account.

Number of Posts: There is no limit on the number of posts you can have on one blog. They will all be saved on your account (unless you manually delete them) regardless of whether you are publishing archives or not.

Size of Posts: Individual posts do not have a specific size limit, but very large posts may run you up against the page size limit. (See the next item.)

Size of Pages: Individual pages (the main page of your blog, or your archive pages) are limited to 1 MB in size. This will allow for a few hundred pages of text, but it may be a problem if you are listing hundreds of posts on the front page of your blog. If you hit this limit, you will see an error message saying "006 Please contact Blogger Support." You can get around this error by lowering the number of posts on your main page, which will have the added benefit of making your page load faster as well.

Number of Comments: A post can have any number of comments. As with archived posts, if you choose to hide comments on your blog, all pre-existing comments will remain saved on your account.

Number of Pictures: Up to 1 GB of total storage, shared with Picasa Web

Size of Pictures: If you are posting pictures through Blogger Mobile there is a limit of 250K per picture.

Team Members: There is a limit of 100 members per blog.

Number of Labels: Up to 2000 unique labels per blog and 20 per post.

Blog Description: Limited to 500 characters, with no HTML. Adding additional characters or HTML may cause it to revert to a previous setting.

"About Me" Profile Information: Maximum of 1,200 characters.

Profile Interests and Favorites: Maximum of 2,000 characters in each field.

Sunday, January 10, 2010

Adding image to your blog header

It's very simple for now to adding an image (or banner) to your blog header by following these steps:

  1. Login to your Blogger Dashboard
  2. Go to Design (or Layout)
  3. In Page Elements tab, click Edit on your blogger Header element.
  4. From Configure Header panel, browse an image from your computer or place an image URL from internet that you want to make it for your header image
  5. After the image is uploaded, you can select one of  these options "Behind title and description", "Instead of title and description" or "Have description placed after the image". Check on "Shrink to fit" option to let Blogger auto-scales your image to blogger's dimension.
  6. Click SAVE button to done your works and enjoy your blogging! ;-)

Saturday, January 2, 2010

Starting with a new post

Blogger offers an easy way to collaborate, discuss, or share your thoughts with others. After created a blog with your own name and URL. This guide will help you familiarize yourself with the main features of Blogger and get started writing your own blog.

Write your post

Once you've signed in to Blogger, you'll see your dashboard with your list of blogs. Here's what you need to do:
  1. Click the New Post button and enter anything you want to share with the world.
  2. Next, you'll see the Create New Post page. Start by giving your post a title (optional), then enter the post itself:
  3. When you're done, click the Preview button to make sure it's ready to go.
  4. Once you're satisfied with your post, click the Publish Post button. This will publish your new post.
Add an image

You can add an image from your computer or the Web to your blog. Click the image icon in the post editor toolbar. A window appears prompting you to browse for an image file on your computer, or enter the URL of an image on the Web.

Once you've selected your image, you can then choose a layout to determine how your image will appear in your post:
  • The 'Left', 'Center', and 'Right' options allow you to customize the way your blog text will flow around your image.
  • The 'Image size' options will determine how large the image will appear within your post.
  • The 'Ad caption' option will let you write captions for your photo.
Click UPLOAD IMAGES to add your image, and then click DONE when the notification window appears telling you that 'Your image has been added.' Blogger will then return you to the post editor, where you'll see your image ready to be published to your blog.

You can also publish images to your blog using your mobile device, Google's free photo software Picasa, or a third-party service like Flickr.

Add a video

To add a video to your blog post, click the film strip icon in the post editor toolbar above where you compose your blog text. A window appears prompting you to 'Add a Video.'

Click Browse to select the video file from your computer that you'd like to upload. Note that Blogger accepts AVI, MPEG, QuickTime, Real and Windows Media files and that your video must be less than 100MB in size.

Before uploading your video, you must agree to the Terms and Conditions (you'll only have to do this the first time that you upload a video with Blogger). Then click UPLOAD button.

While your video uploads, you'll see a placeholder in the post editor showing where your video will appear. You'll also see a status message below the post editor letting you know that your upload is in progress. Depending on the size of your video, this usually takes about five minutes. When it is complete, your video will appear in the post editor.


Blogger also let you add a video to your blog from YouTube easier with a 'YouTube search'  option, this will help you add any video from YouTube you want or your own video from your YouTube channel with a 'My YouTube video' option.

Customizing your layout

Your template is a fun way to customize your blog. When creating a new blog, you're first asked to choose a default template, this is the basic design of your blog. You can choose from customize your blog's design using the intuitive drag-and-drop interface. You can also add powerful gadgets such as slideshows, user polls, or even AdSense ads. Changing the fonts and colors on your blog is easy too. If you want more precise control over your blog's layout, you can also use the Edit HTML feature. To edit your blog's layout, follow these steps:
  1. Click the Design link from your dashboard below the blog you would like to customize.
  2. From the Page Elements sub-tab, click Edit to edit existing gadgets, or Add a Gadget to add new ones.
  3. To add a new gadget after you've clicked Add a Gadget, simply click the plus sign next to your desired gadget. You can choose from gadgets by category, or search for a specific gadget in the top right of the pop-up window.
  4. Once you've added the necessary information to your selected gadget, click SAVE. Your layout changes will appear instantly.

Privacy and permissions

By default, your blog is completely public, and can be read by anyone on the internet. However, if you want to keep it private, you can do that, too. You can change these settings on the Settings | Permissions tab.
  1. Under the 'Blog Readers' heading, you'll probably see 'Anybody' selected as the default. When you change this to 'Only readers I choose,' you'll get an Add Readers button.
  2. Click the Add Readers button and then enter the email address of a person to whom you'd like to grant access to your blog. To add multiple people, separate their addresses with commas.
  3. For each address entered, the Google Account associated with that address will be given access to view your blog. If an address is not associated with an account, that person will receive an invitation email with a link allowing them do one of three things:
  • Sign in to an existing account.
  • Create a new account.
  • View your blog as a guest (no account required).
Follow other blogs

With the Blogger Following feature you can keep track of the blogs you follow via your Reading List on the Blogger dashboard. There are several ways to become a follower of a blog. One of the easiest ways is to visit a blog that has added the 'Following' widget, ad then follow these steps:
  1. Click the FOLLOW THIS BLOG link under the 'Followers' widget.
  2. You'll then see a pop-up window with the options to either follow publicly or anonymously.
  3. Select how you'd like to follow the blog, then click the orange FOLLOW button. You're now a follower of the blog! If you chose to follow the blog publicly, your profile picture will be displayed on the blog with a link to your Blogger profile.
  4. When you become a follower of a blog, the blog will also be added to your Reading List on your Blogger dashboard. Additionally, you can become a follower of any blog or URL (even if the blog doesn't have the 'Followers' widget) by adding the blog to your Reading List on the dashboard.