Tuesday, March 23, 2010

Making a "blogroll" easier with Bblogger gadget

Bloggers often feature a list of their favorite blogs, called a “blogroll,” in the sidebar of their own blog. And  the Blog List gadget will help you make it more powerful and useful, also mixed it in with your favorite blogs in Google Reader.

At its most basic, Blog List displays a list of links to your favorite blogs, with an optional icon. If you link to a blog with an Atom or RSS feed, however, the Blog List can show the date of the blog’s last update or even the title and snippet of its most recent post.

You can set the number of blogs to show in the list and whether they should be sorted by update time or alphabetically by blog title.

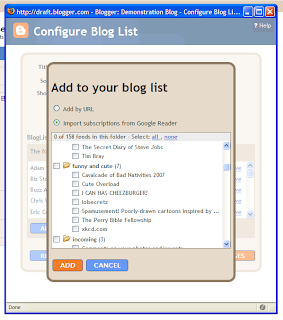
You add blogs to your Blog List by entering blog or feed URLs directly, or by importing subscriptions from Google Reader. When you add by URL, Blogger will attempt to detect an Atom or RSS feed for it in order to show post and update information. If none is found, the blog will still be added to the Blog List, just as a simple link.

To add a Blog List (Or two! Or more!) to your blog, just choose Blog List gadget from Design | Page Elements | Add a Gadget

Notes

  • The Blog List writes all links out in HTML so that, unlike JavaScript-based blogrolls, you pass PageRank goodness on to the blogs you link to.
  • The icon next to a feed is taken from the favicon.ico file in the blog’s home directory. Blogger currently does not support the “shortcut icon” link tag.
  • Some blogs don’t link to their Atom and RSS feeds in a way that Blogger can detect. In these cases, add the feed URL to the Blog List for best results.
  • Only the blog admin who added the Blog List may edit and configure it.

Saturday, March 13, 2010

Blogger Template Designer

Blogger Template Designer is a new way for you to easily customize the look of your blog. You can select a variety of templates, images, colors, and column layouts to make your blog an expression of you.


As you play around with the Template Designer, you’ll see a preview of how the blog will appear based on the choices you’ve made, which you can expand to by pressing the toggle to Expand Preview between the Blogger Template Designer dashboard and the preview. When you’re satisfied with the look of your blog, you can make them go live by pressing Apply to Blog in the top right hand corner of the Template Designer.


To get started with Blogger Template Designer, select a template for your blog from one of the professionally designed templates that are available. Each template appears as a large thumbnail that when clicked will show different variations on the template below that you can select by clicking on them. Note that clicking a new template will erase any customizations you’ve made on a previous template. Once you’ve chosen a template, you can continue customizing the look of your blog.

No matter what template you are previewing in Template Designer, you can always see what is currently live on your blog by looking at the Live on Blog thumbnail in the Template Designer control panel. You can also click on it to reset the template in the Template Designer to the live version of your blog.


Background

Even though you’ve chosen a template, you can still change the way that it looks. Using Blogger Template Designer, you can choose the background color or image for your blog and then play with the color scheme. To start customizing your background, click on the thumbnail under Background Image.

One of the best new features of Template Designer is the ability to change the color of your background image. This is possible when a background image has transparency. You can tell that a background image is transparent because it has a checkerboard in the top right hand corner of the image.


Once you’ve selected your image, you can change the color of the background by clicking on Main Color Theme and then selecting the color of your choice.


You can only change the color of your background if the background is transparent. Also, if the template that you chose has a grey background, you cannot change its color.

In addition to selecting and personalizing your blog’s background image, you can also choose a color theme to apply to aspects of your blog, including text and links. You can do this by playing with the Main Color Theme or by choosing one of our Suggested Themes. Changing the color theme of your blog will change the colors for all aspects of the blog template that can be changed.

Note: If background image is not transparent, themes will alter the text color scheme of the blog.

Layout

You can choose a variety of layout options for your blog, from one to three columns. These layouts feature drag and drop functionality for gadgets. You will also have a variety of layout options for the blog footer as well.


If you want to add or remove gadgets or edit gadget settings, you cannot do this through Blogger Template Designer. Rather, you have to do this on the general Layout tab.

Adjust Width

You can change the width of the blog, and the right and left columns by dragging the slider for the different parts of blog layout. Note that the options you see here correspond to the type of layout that you chose. If, for example, you chose a blog with left and right columns, you will see both left and right column sliders. If, however, you chose a blog with only a left column, you will only see that option here.

Wednesday, March 10, 2010

Creating 'After the jump' summaries for your posting

Jump Breaks is a feature which lets you create expandable post summaries in your blog posts, so longer posts appear as an intro with a link to "Read More."

Creating jump breaks in your blog posts can be easily done right from the post editor, without the need for any HTML changes. There are a couple of ways to insert a "Read more" jump to your posts. If you use the new post editor (available on Blogger in Draft, or by enabling it via the Settings tab), you'll notice the "Insert jump break" icon in the editor's toolbar. Click this icon and the "jump break" will be inserted into your blog post at your cursor's position.


If you don't use the new post editor, you can still insert a jump break in Edit HTML mode by adding <!-- more --> where you want to position the jump break.


Want to change the "Read more" text to something more your style? No problem. You can edit the "Read more" text by clicking Layout and then Edit the Blog Posts widget.


One more note, the Jump Break feature does not change how your post appears in your feed. You can configure post feed options by going to Settings | Basic | Site Feed, and editing Allow Blog Feeds.

Note: For those using a customized third-party template, you will have to add a snippet of code to make Jump Breaks work.

To do this, access your blog's Layout | Edit HTML tab, and first backup your template by clicking the Download Full Template link at the top of the page. This will download an XML version of your template which you can upload later at any time if you need to.

After backing up your template, then click the Expand Widget Templates checkbox, and scan your HTML for the following snippet:
<data:post.body/>
Once you've located that code, paste the following snippet directly below it:
<b:if cond='data:post.hasJumpLink'>
<div class='jump-link'>
<a expr:href='data:post.url + "#more"'><data:post.jumpText/></a>
</div>
</b:if >
After you've pasted in the code, click Save and then you're done!

Monday, March 8, 2010

How to create a team blog

Team blogs are quite useful when small groups of people wish to contribute to a single blog. Basically, one person initially creates the blog, then adds other people to it as members.

Team members can either be administrators or not. Administrators can edit all posts (not just their own), add and remove team members (and grant admin access), and modify the blog's settings and template. Non-admins can only create and edit their own posts.

Here's how to add members to your blog:

First, go to Settings | Permissions:


Then click Add Authors:
Next, type the email addresses of the people you're inviting to the blog, separating each address with a comma. They'll receive an email with a confirmation link soon. Note that they must have Google Accounts, and if they don't already, they'll be prompted to create one.
When you're ready to send the invitations, click Invite.

To remove a team member, go to the Settings | Permissions tab and click the "remove" link of person you want to remove:

Saturday, March 6, 2010

How to hide the Blogger Navbar

It's easy if you want to hide the Blogger Navbar. All you need to do is copy/paste this code to the Edit Template section.
#navbar { display: none; }
- In your Blogger Dashboard, go to Design | Edit HTML.in your Blogger dashboard.
- Next, find the line ]]></b:skin>, then insert the following lines of code above.
- Click Save Template to save your work.
- And you're done.

Paste the code like this

Saturday, February 27, 2010

How to Backup / Restore your Blogger Template

Your Blogger blog is stylized based on a blog template that you have full access to. This blog template allows you to manipulate the visual appearance of your Blogger blog and gives you the freedom to create a unique personal brand by using the Edit HTML mode in Design tab. When you decide to enhance your Blogger blog by editing the template you will have to backup your blog template first to ensure you have a restore file in case you make a mistake in the editing process. This step-by-step guide will show you how.
  • From your Blogger Dashboard, go to Design | Edit HTML.
  • To backup your blog template,  click the link "Download Full Template" under the "Backup / Restore Template" pane. Choose the option to save your template file from the next dialog that pops up. Browse to the location you want to save it and click Save. The template will be downloaded to the specified location. It's a small XML file and has all the details of your current template.
  • To restore your blog template, just click the Browse button and browse to the downloaded template file then click Open. Click Upload button and Blogger will restore your template.

* Make sure to backup your blog template everytime you want to edit it in Edit HTML mode.

Saturday, February 20, 2010

How to change your Display Name that appears at the end of each post

To change your Display Name, click the Edit Profile link on your Dashboard page:


Scroll down to the Identity section and change the Display Name:


Once you've changed your Display Name, click the Save Profile button at the bottom of the page.

Sunday, February 14, 2010

Making Custom Templates Compatible With Pages Tabs

If you are familiar with HTML and want Pages as tabs, follow these steps carefully (caution - this is not for the faint of heart!):
  1. Make sure the Pages Widget hasn't already been added, if so, remove the widget
  2. Go to the Design | Edit HTML tab for your blog
  3. Download a backup of your template by clicking Download Full Template
  4. Click the checkbox next to Expand Widget Templates
  5. Look for the following three lines of HTML. If this HTML exists, change showaddelement='no' to showaddelement='yes'
    <div id='crosscol-wrapper' style='text-align:center'>
    <b:section class='crosscol' id='crosscol' showaddelement='no'/>
    </div>
  6. If this HTML does not exist, paste the following lines of HTML where you want the tabs to appear (for instance, after <div id="content-wrapper">)
    <div id='crosscol-wrapper' style='text-align:center'>
    <b:section class='crosscol' id='crosscol' showaddelement='yes'/>
    </div>
  7. Confirm tabs are correctly added, click Save Template
  8. Go to Design | Page Elements and look for the new horizontal Gadget area and add the Pages gadget there.
Read more: Create Pages in Blogger

How Blogger autosaves your posts

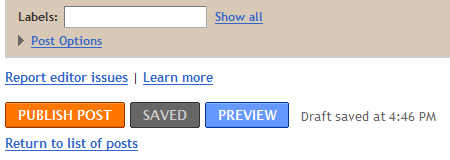
When you create a new post, Blogger will start automatically saving it for you once a minute, without interrupting your typing. When it does this, you'll see a little note next to the "Save" button, like this:

If you want to make sure the saved copy is completely up to date, you can click the "Save" button yourself. You'll remain on the posting form and can continue typing, since the saving happens in the background. If you're done working on the post for now, you can either click "Publish Post" to convert the draft into a post, or click "Return to list of posts" if you want to leave it as a draft and go back to the Edit Posts page.


This autosave feature means that you have a safety net for the cases when you're working on a new post and the power goes out, or your browser crashes, or some other calamity occurs. All you have to do is log back in to Blogger and find your saved draft on the Edit Posts page. You can even do that from a different computer.

Note: Autosave does not occur when you are editing posts that have previously been published to your blog. This keeps your readers from seeing your edits until you're done with them. When editing a published post, you can click "Publish Post" to republish the changes to your blog, or click "Save as Draft" to unpublish the post and turn it into a draft.

Tuesday, February 2, 2010

How to Import or Export your Blogger blog

Now you can export all of your posts and comments into a single, Atom-formatted XML file for easy backup. You can then import the posts back into Blogger, either into an existing blog or into a new one.

To export your blog, log in to http://draft.blogger.com/ and go to the Settings | Basic page. You’ll see the Blog Tools links at the top of the page for importing and exporting.

* Google also moved blog deletion up here from the bottom of the page. Don’t worry about accidentally clicking it, though; your blog wouldn’t be deleted until you confirmed on the next page. By the way, if you deleted your blog, you can be restored it within 90 days before it is removed forever.

Once you click “Export blog” and press the “Download blog” button on the next page, your browser will prompt you to save the XML file for your blog. Keep it somewhere safe as a backup, or import it into a different blog.


You can import one blog into another from the Blog Tools links, or when creating a new blog. Look for the “Advanced Setup Options” at the next page. There's an Import Blog Tool, click on it to import your XML file.


When you import a blog, all of the posts will get saved in an “imported” state. From there you can publish just a few, or all of them at once. Here are some ideas for what you can do with importing and exporting:
  • Merge two or more blogs into one. Take the exported posts and comments from one blog and import them into another one.
  • Move individual posts from blog to blog. After importing, select just a set of posts to publish and publish them with one click.
  • Back up your blog to your own storage. You can keep your words safe and under your control in case anything happens to your blog, or us, or if you want to remove them from the Internet.
  • Move your blog somewhere else. Our export format is standard Atom XML. We hope to see other blogging providers extend their Atom support to include import and export. And, if you decide to come back to Blogger, importing your export file will get you back up and running in seconds.
Caveats
  • The export format currently only covers blog posts and comments to those posts, not blog settings or templates. To back up a Classic template, copy and paste the template code from the editor. To back up a Layouts template, use the Backup / Restore template option to download a copy of your template.
  • Before importing a blog for the first time, we recommend that you create a new, throwaway blog to import into so you get a sense for how the process works. Once you’re comfortable, import into your public blog.
  • At the moment there is a 1MB size limit on the blog you can import.
Have you imported or exported your blog?