
The Configure Blog Post window will display a handful of options, and the Reactions feature is near the bottom of the list:
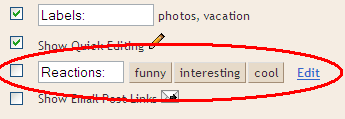
To turn on Reactions just select the checkbox, and then you will be able to customize the feature by adding words of your choosing. Finally, you can choose the exact location of Reactions by dragging the widget at the bottom of the Configure Blog Post page:

Tips
You can customize the location of the Reactions within the post by dragging the preview around in the “Arrange Items” box.

You can customize the options and their label to match the theme and style of your blog.


- This is a Layouts-only feature. If you’re using a Classic template you’ll need to upgrade to Layouts to add Reactions.
- The buttons should blend seamlessly with most blog backgrounds. Button backgrounds are a mostly transparent grey which should coordinate with everything. The text and button highlight colors for the ratings are taken from the following skin variables:
- Foreground: textcolor, textColor, mainTextColor
- Highlight: linkcolor, linkColor, mainLinkColor
- If you have customized your blog widget’s template you may not see the reactions. You will need to either reset your blog widget’s template or copy the Reactions code from a fresh template. Search for “reactions-buttons” to find the appropriate block of code.
- A known issue: if you choose short words/phrases, it’s possible to enter enough options that the line of buttons will wrap (and not look very good).
This is a Layouts-onlybuy Diablo 3 Gold feature. If you’re using a Classic template you’ll need toCheap GW2 Gold upgrade to Layouts to add Reactions.
ReplyDeleteThe capacity to swiftly and precisely organize tags across a multitude of articles is exceptionally advantageous for preserving uniformity and guaranteeing precise classification of pertinent material. Cisco distributors in dubai
ReplyDelete