Saturday, February 27, 2010

How to Backup / Restore your Blogger Template

Your Blogger blog is stylized based on a blog template that you have full access to. This blog template allows you to manipulate the visual appearance of your Blogger blog and gives you the freedom to create a unique personal brand by using the Edit HTML mode in Design tab. When you decide to enhance your Blogger blog by editing the template you will have to backup your blog template first to ensure you have a restore file in case you make a mistake in the editing process. This step-by-step guide will show you how.
  • From your Blogger Dashboard, go to Design | Edit HTML.
  • To backup your blog template,  click the link "Download Full Template" under the "Backup / Restore Template" pane. Choose the option to save your template file from the next dialog that pops up. Browse to the location you want to save it and click Save. The template will be downloaded to the specified location. It's a small XML file and has all the details of your current template.
  • To restore your blog template, just click the Browse button and browse to the downloaded template file then click Open. Click Upload button and Blogger will restore your template.

* Make sure to backup your blog template everytime you want to edit it in Edit HTML mode.

Saturday, February 20, 2010

How to change your Display Name that appears at the end of each post

To change your Display Name, click the Edit Profile link on your Dashboard page:


Scroll down to the Identity section and change the Display Name:


Once you've changed your Display Name, click the Save Profile button at the bottom of the page.

Sunday, February 14, 2010

Making Custom Templates Compatible With Pages Tabs

If you are familiar with HTML and want Pages as tabs, follow these steps carefully (caution - this is not for the faint of heart!):
  1. Make sure the Pages Widget hasn't already been added, if so, remove the widget
  2. Go to the Design | Edit HTML tab for your blog
  3. Download a backup of your template by clicking Download Full Template
  4. Click the checkbox next to Expand Widget Templates
  5. Look for the following three lines of HTML. If this HTML exists, change showaddelement='no' to showaddelement='yes'
    <div id='crosscol-wrapper' style='text-align:center'>
    <b:section class='crosscol' id='crosscol' showaddelement='no'/>
    </div>
  6. If this HTML does not exist, paste the following lines of HTML where you want the tabs to appear (for instance, after <div id="content-wrapper">)
    <div id='crosscol-wrapper' style='text-align:center'>
    <b:section class='crosscol' id='crosscol' showaddelement='yes'/>
    </div>
  7. Confirm tabs are correctly added, click Save Template
  8. Go to Design | Page Elements and look for the new horizontal Gadget area and add the Pages gadget there.
Read more: Create Pages in Blogger

How Blogger autosaves your posts

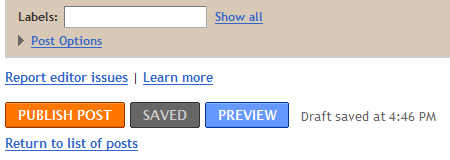
When you create a new post, Blogger will start automatically saving it for you once a minute, without interrupting your typing. When it does this, you'll see a little note next to the "Save" button, like this:

If you want to make sure the saved copy is completely up to date, you can click the "Save" button yourself. You'll remain on the posting form and can continue typing, since the saving happens in the background. If you're done working on the post for now, you can either click "Publish Post" to convert the draft into a post, or click "Return to list of posts" if you want to leave it as a draft and go back to the Edit Posts page.


This autosave feature means that you have a safety net for the cases when you're working on a new post and the power goes out, or your browser crashes, or some other calamity occurs. All you have to do is log back in to Blogger and find your saved draft on the Edit Posts page. You can even do that from a different computer.

Note: Autosave does not occur when you are editing posts that have previously been published to your blog. This keeps your readers from seeing your edits until you're done with them. When editing a published post, you can click "Publish Post" to republish the changes to your blog, or click "Save as Draft" to unpublish the post and turn it into a draft.

Tuesday, February 2, 2010

How to Import or Export your Blogger blog

Now you can export all of your posts and comments into a single, Atom-formatted XML file for easy backup. You can then import the posts back into Blogger, either into an existing blog or into a new one.

To export your blog, log in to http://draft.blogger.com/ and go to the Settings | Basic page. You’ll see the Blog Tools links at the top of the page for importing and exporting.

* Google also moved blog deletion up here from the bottom of the page. Don’t worry about accidentally clicking it, though; your blog wouldn’t be deleted until you confirmed on the next page. By the way, if you deleted your blog, you can be restored it within 90 days before it is removed forever.

Once you click “Export blog” and press the “Download blog” button on the next page, your browser will prompt you to save the XML file for your blog. Keep it somewhere safe as a backup, or import it into a different blog.


You can import one blog into another from the Blog Tools links, or when creating a new blog. Look for the “Advanced Setup Options” at the next page. There's an Import Blog Tool, click on it to import your XML file.


When you import a blog, all of the posts will get saved in an “imported” state. From there you can publish just a few, or all of them at once. Here are some ideas for what you can do with importing and exporting:
  • Merge two or more blogs into one. Take the exported posts and comments from one blog and import them into another one.
  • Move individual posts from blog to blog. After importing, select just a set of posts to publish and publish them with one click.
  • Back up your blog to your own storage. You can keep your words safe and under your control in case anything happens to your blog, or us, or if you want to remove them from the Internet.
  • Move your blog somewhere else. Our export format is standard Atom XML. We hope to see other blogging providers extend their Atom support to include import and export. And, if you decide to come back to Blogger, importing your export file will get you back up and running in seconds.
Caveats
  • The export format currently only covers blog posts and comments to those posts, not blog settings or templates. To back up a Classic template, copy and paste the template code from the editor. To back up a Layouts template, use the Backup / Restore template option to download a copy of your template.
  • Before importing a blog for the first time, we recommend that you create a new, throwaway blog to import into so you get a sense for how the process works. Once you’re comfortable, import into your public blog.
  • At the moment there is a 1MB size limit on the blog you can import.
Have you imported or exported your blog?