“+1” is often used as a digital shorthand for “this is pretty cool.” It’s also a way for friends, contacts, and the rest of the world to find great things on Google search. Google launched the +1 button back in March as a way to help share web content and make search more personal and relevant.
To add the +1 button to your blog, you’ll need to enable Share buttons on Blogger. To do this, go to Design | Page Elements on your Blogger dashboard, find the Blog posts area, click on Edit, and select the “Show Share Buttons” option. If you are already using Share buttons, the +1 button will automatically show up as a new share option.
By adding the +1 button to your blog, you’re providing an easy way for your visitors to recommend your posts to their friends right from your blog.
[via]
Showing posts with label Gadgets. Show all posts
Thursday, June 2, 2011
Monday, March 21, 2011
Adding a Drop-Down menu to your Blogger blog
One of the most convenient way to display huge lists of links, like BlogRoll or favorite sites etc. is using a drop down menu. The tool is very useful for webmasters and bloggers, and equally simple is the coding required to put it on your blog/web site.
Follow these simple steps, to add a Drop-Down menu to your blog:
From your Dashboard, go to "Design" section, then click on "Add a Gadget", and select it as "HTML/JavaScript"
Now put this code in to it:
Enjoy!
Follow these simple steps, to add a Drop-Down menu to your blog:
From your Dashboard, go to "Design" section, then click on "Add a Gadget", and select it as "HTML/JavaScript"
Now put this code in to it:
<form><select name="menu" onchange="window.open(this.options[this.selectedIndex].value,'_blank')"
size=1 name=menu>
<option>- Your Title - </option>
<!-- change the links with your own -->Replace the titles in blue and the links in red with your owns then click Save and you're done.
<option value="http://yourlink#1.com">Title One</option>
<option value="http://yourlink#2.com">Title Second</option>
<option value="http://yourlink#3.com">Title Third</option>
</select></form>
Enjoy!
Saturday, March 19, 2011
Putting AdSense on Your Blog
First of all, choose the blog that you want to put AdSense on, and go to the Monetize tab. You can get there by clicking the Monetize link of the blog you want on the dashboard.
Once you're there, choose one of the three options to display your ads: in your sidebar and posts, just in your sidebar, or just below your posts. Or just enable AdSense reporting if you already manually enabled ads on your blog (choose this option to start seeing AdSense reports on the Monetize tab).
The next page asks you to either sign up for a new AdSense account or use an existing one. Once you've signed in or created or account, you'll get a confirmation screen. If for any reason you need to switch to using a different AdSense account, click the switch AdSense accounts link on this page.
Once you're there, choose one of the three options to display your ads: in your sidebar and posts, just in your sidebar, or just below your posts. Or just enable AdSense reporting if you already manually enabled ads on your blog (choose this option to start seeing AdSense reports on the Monetize tab).
The next page asks you to either sign up for a new AdSense account or use an existing one. Once you've signed in or created or account, you'll get a confirmation screen. If for any reason you need to switch to using a different AdSense account, click the switch AdSense accounts link on this page.
Blogger provides a simple way for you to make money with your blog. AdSense is Google's content-targeted advertising program. This means that you don't select keywords or categories for your ads. Instead, Google's servers determine what your posts are about and display the most relevant ads to your readers. So, if you blog about baseball, there might be ads for Major League Baseball memorabilia next to your post. If you blog about painting, there might be ads for art supplies.
Blogger requests access to your AdSense account in order to allow us to create and place ad code on your page through our layouts and template tools. As part of this process, you may notice that Blogger is receiving "0%" of your AdSense earnings - this means that you will receive the same amount for clicks or impressions as you would creating the ad code from your AdSense account. To view any partners that have requested access to your AdSense account, and their associated revenue shares, please log in to your AdSense account, click the "My Account" tab, and choose the "Account Access" sub-tab. If you see a "grant access" link next to blogger.com, you must click this link in order to create ads with Blogger tools.
Thursday, March 17, 2011
Make it easy for readers to follow your blog by email
Fresh content is the fuel that drives the blogosphere; it keeps readers coming back to your blog. And today Blogger realesed a new, powerful way to do just that with Follow by Email, depending on your blog feed.
The Follow by Email gadget provides blog authors a simple way for their readers to subscribe to the latest hot-off-the-press updates, which are delivered directly to the reader’s inbox. When new blog content is published, all subscribed readers will receive a daily email notification of the new published posts, which includes a copy of the new content as well as links back to the actual posts.
To enable Follow by Email, click the Add a Gadget link from the Design | Page Elements tab, and then select the Follow by Email gadget which should be at the top of the list. Once you add the gadget, readers visiting your blog can then just enter their email address and click Submit.
Taking advantage of Feedburner technology, Follow by Email will also track your subscription information, such as the number of subscribers and daily views. To view these stats, log into Feedburner.com, and select the appropriate blog feed from your list.
[via Blogger Buzz]
The Follow by Email gadget provides blog authors a simple way for their readers to subscribe to the latest hot-off-the-press updates, which are delivered directly to the reader’s inbox. When new blog content is published, all subscribed readers will receive a daily email notification of the new published posts, which includes a copy of the new content as well as links back to the actual posts.
To enable Follow by Email, click the Add a Gadget link from the Design | Page Elements tab, and then select the Follow by Email gadget which should be at the top of the list. Once you add the gadget, readers visiting your blog can then just enter their email address and click Submit.
Taking advantage of Feedburner technology, Follow by Email will also track your subscription information, such as the number of subscribers and daily views. To view these stats, log into Feedburner.com, and select the appropriate blog feed from your list.
[via Blogger Buzz]
Thursday, March 3, 2011
Adding Google Translate gadget to your blog
Google Translate is a free translation service that provides instant translations between 57 different languages. It can translate words, sentences and web pages between any combination of our supported languages. By adding Google Translate gadget to your blog, you have a chance to increase your traffic with the readers who don't use your language but still interested with your contents.
Enjoy!
- Go to Google Translate gadget page
- Choose your blog language in Step 2
- Setting your gadget display, specific languages or choosing another advanced settings in Step 3
- Go to Step 4 on Google Translate gadget page to copy and paste the snippet of code into HTML/JavaScript of your blog by going Dashboard | Design | Add a Gadget
Enjoy!
Wednesday, October 13, 2010
Adding recent comments to your blogger blog by using Feed URL
It's easy to add your blog's recent comments to your blogger blog by using Feed URL for now.
- From your Dashboard blog, go to Design | Add a Gadget in Page Elements panel
- Choose Feed then paste your Feed comment URL here: http://yourbloggerblog.blogspot.com/feeds/comments/default. Remember to change this URL to your own domain name.
- Click COUTINUE and choose any options that you want to display on your blog: number of comments, authors, dates
- Click SAVE to done your work
Saturday, September 18, 2010
How to put Facebook Badges to your Blogger blog
Facebook can easily be integrated into almost every aspect of your life, from mobile phones to personal Web sites. Put your badge on a site and it will be automatically updated and visible to anyone (even non-Facebook users). This is great for signatures on a forum or as a sidebar on your own Web site.
Now, it's easy for you to put your Facebook badge on your own Blogger blog.
There're 4 Facebook badges for now:
Now, it's easy for you to put your Facebook badge on your own Blogger blog.
- Login to your Facebook account
- Go to the Facebook Badges pages
- Choose the badge you want to put on your Blogger blog
- Click on the Blogger icon
on Preview page to put it on your blog - You're done
- After choosing a badge to put on your blog, click on "Edit this badge" on Preview page
- Set the basic layout and format
- Add any items from the drop-down menu that you want to include in your badge. Click the "Add Item" button to add it to your badge. You may add more than one item. With no template, you can add anything you want to your badge. It will preview as you make additions.
- Hit the "Save" button to complete your badge and get the necessary code to post it.
There're 4 Facebook badges for now:
- Profile Badge Share your Facebook information on other websites
- Like Badge Show off your favorite Pages on your website or blog
- Photo Badge Share your Facebook photos on other websites
- Page Badge Share your Facebook Page information on other websites
Saturday, September 11, 2010
Blogging from iGoogle and Gmail
The Blogger Posting gadget makes it easy to post to your blog from the convenience of Gmail or your iGoogle homepage.
To add the Blogger Posting Gadget to your iGoogle page, simply click this button:

Then click the blue "Add to Google" button. Make sure that you're signed in with the same Google account that you use for Blogger. Once you've added the Blogger Posting Gadget you will see the gadget on your iGoogle page:
To add the Blogger Posting Gadget in Gmail, you'll first have to enable the Add Gadget by URL lab feature from your settings:
Once you've enable this Labs feature, then you can add the posting gadget by simpling entering its URL into the Gadget tab in your Settings. Here's the URL:
In the top right corner of the gadget you will see the title of your blog. If you have more than one blog, there will be a drop-down menu in the corner so you can select the blog you'd like to post to. You can then enter a title and write a post. You also have the option to add labels to your post as well. Once you have finished writing your post, click "Publish" to publish your post or click "Save Draft" to save your post back to Blogger without publishing it.
Tips:
To add the Blogger Posting Gadget to your iGoogle page, simply click this button:

Then click the blue "Add to Google" button. Make sure that you're signed in with the same Google account that you use for Blogger. Once you've added the Blogger Posting Gadget you will see the gadget on your iGoogle page:
To add the Blogger Posting Gadget in Gmail, you'll first have to enable the Add Gadget by URL lab feature from your settings:
Once you've enable this Labs feature, then you can add the posting gadget by simpling entering its URL into the Gadget tab in your Settings. Here's the URL:
http://www.blogger.com/gadgets/post.xml
In the top right corner of the gadget you will see the title of your blog. If you have more than one blog, there will be a drop-down menu in the corner so you can select the blog you'd like to post to. You can then enter a title and write a post. You also have the option to add labels to your post as well. Once you have finished writing your post, click "Publish" to publish your post or click "Save Draft" to save your post back to Blogger without publishing it.
Tips:
- The gadget supports editing the HTML of title and body.
- If you start writing a post and decide you want to upload images or use other rich text features, just click "Save Draft". The gadget will save your post, then give you a link to directly edit the post in Blogger.
- The gadget works in Firefox, Chrome, Safari 3, Internet Explorer and on the iPhone.
Tuesday, August 31, 2010
Stats Gadgets
After launched the Blogger Stats to Blogger in Draft, Blogger staff has created two new gadgets that you can add to your blog to show your readers interesting stats from your blog: Blog’s stats and Popular Posts gadgets.
The data for these gadgets is automatically taken from Blogger Stats. To use them, go to Design | Page Elements, and click on “Add a gadget.”
The Blog’s stats gadget displays total pageviews* of your blog. The gadget comes in different styles and also features an optional sparkline graph.
(* The pageviews are counted from when Blogger rolled out the Stats feature, not from the first day your blog was created.)
The Popular Posts gadget helps your readers quickly find out which of your posts have been viewed the most by your readers. The gadget also comes with several different styles and configurations.
The new Stats gadgets are available now on Blogger in Draft, so you can go ahead and give them a try now.
* Tips:
In the Blog's Stats gadget, you can choose the time window of your pageview counts (All Time, Last 30 days, Last 7 days)
In the Popular Post gadget, you can now choose the number of posts you want the gadget to display.
The data for these gadgets is automatically taken from Blogger Stats. To use them, go to Design | Page Elements, and click on “Add a gadget.”
The Blog’s stats gadget displays total pageviews* of your blog. The gadget comes in different styles and also features an optional sparkline graph.
(* The pageviews are counted from when Blogger rolled out the Stats feature, not from the first day your blog was created.)
The Popular Posts gadget helps your readers quickly find out which of your posts have been viewed the most by your readers. The gadget also comes with several different styles and configurations.
The new Stats gadgets are available now on Blogger in Draft, so you can go ahead and give them a try now.
* Tips:
In the Blog's Stats gadget, you can choose the time window of your pageview counts (All Time, Last 30 days, Last 7 days)
In the Popular Post gadget, you can now choose the number of posts you want the gadget to display.
Wednesday, June 23, 2010
Adding Reactions to blog
Adding Reactions is done through the settings page of the Blog Post widget. From the Design | Page Elements tab, simply click the 'Edit' link under the Blog Post widget and a settings window will pop up.
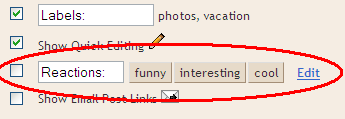
The Configure Blog Post window will display a handful of options, and the Reactions feature is near the bottom of the list:
To turn on Reactions just select the checkbox, and then you will be able to customize the feature by adding words of your choosing. Finally, you can choose the exact location of Reactions by dragging the widget at the bottom of the Configure Blog Post page:
Tips
You can customize the location of the Reactions within the post by dragging the preview around in the “Arrange Items” box.
You can customize the options and their label to match the theme and style of your blog.
Additional Notes
The Configure Blog Post window will display a handful of options, and the Reactions feature is near the bottom of the list:
To turn on Reactions just select the checkbox, and then you will be able to customize the feature by adding words of your choosing. Finally, you can choose the exact location of Reactions by dragging the widget at the bottom of the Configure Blog Post page:
Tips
You can customize the location of the Reactions within the post by dragging the preview around in the “Arrange Items” box.
You can customize the options and their label to match the theme and style of your blog.
- This is a Layouts-only feature. If you’re using a Classic template you’ll need to upgrade to Layouts to add Reactions.
- The buttons should blend seamlessly with most blog backgrounds. Button backgrounds are a mostly transparent grey which should coordinate with everything. The text and button highlight colors for the ratings are taken from the following skin variables:
- Foreground: textcolor, textColor, mainTextColor
- Highlight: linkcolor, linkColor, mainLinkColor
- If you have customized your blog widget’s template you may not see the reactions. You will need to either reset your blog widget’s template or copy the Reactions code from a fresh template. Search for “reactions-buttons” to find the appropriate block of code.
- A known issue: if you choose short words/phrases, it’s possible to enter enough options that the line of buttons will wrap (and not look very good).
Monday, April 26, 2010
How do I add a poll to your blog?
Do you ever wonder about your visitors' opinions? Maybe you'd like to find out what your readers think about controversial subjects, or perhaps you just want a vote on whether your should change your blog's font to Verdana. Either way, it's simple to do by adding a poll to your blog.
You'll start by going to the Design | Page Elements tab for your blog:
Click the "Add a Page Element" link that appears in the sidebar for your layout. You'll get a popup window with all the different types of page elements you can add to your blog. Look for the one called "Poll" and click on "Add to Blog."
The poll settings let you enter the question you want to ask, and the possible answers you want to allow. You can enter as few or as many possible answers as you like; if you need more than are shown, just click the "add another answer" link.
By default, polls are set to run for a week before they stop accepting new votes, but you can change this time frame by entering a new date in the settings. You can also check the option to allow people to vote for multiple answers, if appropriate.
Once you've saved your poll, it will appear on your blog. The "Vote" button will cast a vote for whatever option is selected, and will display the current tally of all votes. You can also click "Show Results" to see what votes have already been cast without making a vote of your own.

You'll start by going to the Design | Page Elements tab for your blog:
Click the "Add a Page Element" link that appears in the sidebar for your layout. You'll get a popup window with all the different types of page elements you can add to your blog. Look for the one called "Poll" and click on "Add to Blog."
The poll settings let you enter the question you want to ask, and the possible answers you want to allow. You can enter as few or as many possible answers as you like; if you need more than are shown, just click the "add another answer" link.
By default, polls are set to run for a week before they stop accepting new votes, but you can change this time frame by entering a new date in the settings. You can also check the option to allow people to vote for multiple answers, if appropriate.
Once you've saved your poll, it will appear on your blog. The "Vote" button will cast a vote for whatever option is selected, and will display the current tally of all votes. You can also click "Show Results" to see what votes have already been cast without making a vote of your own.
Tuesday, March 23, 2010
Making a "blogroll" easier with Bblogger gadget
Bloggers often feature a list of their favorite blogs, called a “blogroll,” in the sidebar of their own blog. And the Blog List gadget will help you make it more powerful and useful, also mixed it in with your favorite blogs in Google Reader.
At its most basic, Blog List displays a list of links to your favorite blogs, with an optional icon. If you link to a blog with an Atom or RSS feed, however, the Blog List can show the date of the blog’s last update or even the title and snippet of its most recent post.
You can set the number of blogs to show in the list and whether they should be sorted by update time or alphabetically by blog title.
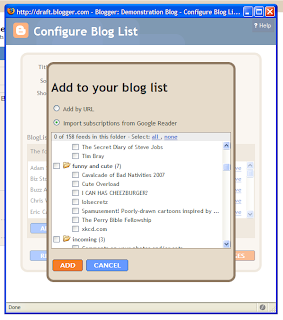
You add blogs to your Blog List by entering blog or feed URLs directly, or by importing subscriptions from Google Reader. When you add by URL, Blogger will attempt to detect an Atom or RSS feed for it in order to show post and update information. If none is found, the blog will still be added to the Blog List, just as a simple link.
To add a Blog List (Or two! Or more!) to your blog, just choose Blog List gadget from Design | Page Elements | Add a Gadget
Notes
At its most basic, Blog List displays a list of links to your favorite blogs, with an optional icon. If you link to a blog with an Atom or RSS feed, however, the Blog List can show the date of the blog’s last update or even the title and snippet of its most recent post.
You can set the number of blogs to show in the list and whether they should be sorted by update time or alphabetically by blog title.
You add blogs to your Blog List by entering blog or feed URLs directly, or by importing subscriptions from Google Reader. When you add by URL, Blogger will attempt to detect an Atom or RSS feed for it in order to show post and update information. If none is found, the blog will still be added to the Blog List, just as a simple link.
To add a Blog List (Or two! Or more!) to your blog, just choose Blog List gadget from Design | Page Elements | Add a Gadget
Notes
- The Blog List writes all links out in HTML so that, unlike JavaScript-based blogrolls, you pass PageRank goodness on to the blogs you link to.
- The icon next to a feed is taken from the favicon.ico file in the blog’s home directory. Blogger currently does not support the “shortcut icon” link tag.
- Some blogs don’t link to their Atom and RSS feeds in a way that Blogger can detect. In these cases, add the feed URL to the Blog List for best results.
- Only the blog admin who added the Blog List may edit and configure it.
Subscribe to:
Posts (Atom)